THIS IS VERY OLD INFORMATION AND SHOULD BE USED FOR REFERENCE ONLY
Live Streaming Audio And Pocket Tunes
Introduction
Streaming audio is a process by which audio (music, speech)
can be read and played before the whole audio file has
been downloaded. With a live stream, listening begins at
the time of "joining" the stream, instead of from the
beginning of the recording. Using pTunes, you simply
connect it to the network, select a streaming server and
within a short while, can listen to music on the go.
In contrast, the "regular" way of listening to mp3s on your
Palm is to download the music to your PC, or rip from
a CD and convert to an mp3 file[1]. You'd then
copy the mp3 files via a USB card reader onto a memory card
which is then put in your palm to play.
Perhaps the most well-known streaming service and
application/protocol suite on the Internet is
Shoutcast.
By service, I mean that they provide a directory of live
streams, and by application suite I mean they provide
tools for setting up your own streaming services, and the
protocol is the underlying network "magic" that makes it
all possible.
These instructions will allow you to connect a live source
of audio (e.g. a radio) to your PC and listen to it on
your Palm via bluetooth connection. It's assumed that the
PC used for streaming is the same one that has the bluetooth
gateway; some notes are provided if you want to have a more
complex system where the streaming server is separate from
the bluetooth gateway.
Pocket Tunes, being the best music player for Palm,
naturally allows you to listen to streamed audio.
This might sound awfully complicated, but don't worry,
it's surprisingly easy to achieve this, even though
the technology underlying this process is very
sophisticated and complex. This is a surefire way to
impress your friends without major effort!
Let's get started!
Brief list of tasks
In order to do this there are several stages to follow.
For the first stage of this tutorial, we'll assume you're
using Microsoft Windows as your PC's. In a separate section
we'll look at using Linux as the
The stages are,
briefly:
- Set up the bluetooth adaptor on a Windows PC
Chances are you'll be using the Widcomm software
suite and drivers with your bluetooth adaptor. If
you're not, you'll have to read these instructions
alongside the manual for your bluetooth adaptor
and do the appropriate things.
- Configure Bluetooth networking on the PC
This really just means internet connection sharing.
You don't really need to do it unless you want your
Palm to access external radio stations (i.e.
sources external to your PC) or to surf the net.
- Set up a streaming server on the PC:
Download Winamp
(the free version works fine)
Download the
Shoutcast server
(get the "SHOUTcast WIN32 Console/GUI server v1.9.4") application
Download the Shoutcast plugin for Winamp
(don't worry that it says Winamp2.x)
- Configure bluetooth and network on the Palm
- Configure Pocket Tunes on the Palm
Even if you're a hardened PC veteran, it's still worth
scanning through these instructions to make sure you don't
miss out on an important step; I will admit to having
tried to short-circuit the setup and then wasted quite a bit
of time having to go through
Detailed instructions
Set up the bluetooth adaptor on a Windows PC
If you've not done this before, follow the link to
step by step details.
The essential points are:
- Install using all defaults
- Open the "My Bluetooth Places" and modify the
properties for "my device"
- In the discovery window:
set the option for
"Let other bluetooth devices discover this computer"
to ON
set Allow to "Only devices listed below" and add your
Palm to the list.
- In the Local Services window:
Change the option "Select the type of service
to offer remote devices" from
Allow other devices to create a private
network with this computer to
Allow other devices to access the
Internet/LAN via this computer
Configure Networking on the PC
We're going to turn on the visual indicator so that the
adaptor shows its status in the system tray, configure
networking for that adaptor.
For the moment, we're not going to touch connection sharing!
on the network interface which connects this computer
to your network or internet. This is quite a short stage.
For full visual instructions click here.
The essential points are:
- Use right-mouse button on "My Network Places"
and choose "properties", or go to
Start Menu->Settings->Network Connections, or find this
in the control panel.
- There should now be an icon for the Bluetooth adaptor; if
there isn't, check that you changed the setting above which
allows "other devices to access the Internet/LAN via this computer".
- Use the right mouse button on the bluetooth adaptor,
and select properties
- Set up the following properties (follow the visual instructions
if you're not sure about this):
- Ensure ONLY Internet Protocol is active on this connection;
leaved unchecked the boxes for
"Client for Microsoft Windows",
"File and Printer Sharing" and "QoS Packet Scheduler" etc.
- It's useful for the "Show icon
in notification area when connected" box to be checked
- Set the IP address to one not in use on
your home network (e.g. 192.168.100.1), and the mask to
255.255.255.0. Remember this address
for later, as you'll be using it on the Palm
- Set the DNS resolver; if not blank, don't touch.
Leave blank if you're in doubt or on dialup. If you're
on a leased line, broadband or other always-on connection,
set the DNS servers to be your or your ISPs servers.
- In the advanced properties, DNS tab, uncheck the "register
this connection's address in DNS"
(this is a bug in Windows and should never be enabled
unless you know what you're doing).
- Close the Bluetooth adaptor properties and
associated windows.
Set up a streaming server on the PC
For detailed instructions with explanatory images, click here.
Installation Quick Checklist
- Installed winamp?
- Installed the Shoutcast Server?
- Installed the Shoutcast plugin?
For all the above, accept the defaults and follow the prompts as normal.
Quick guide to configuring the streaming server
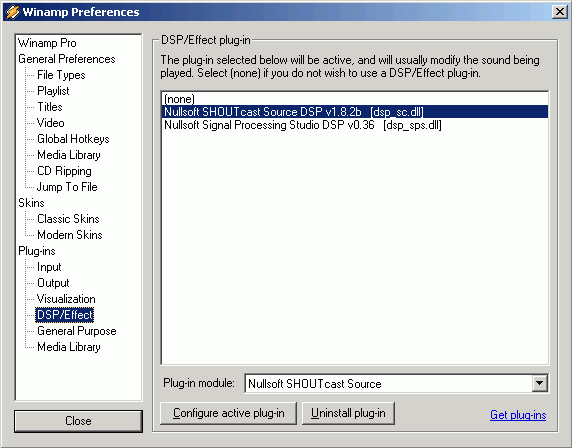
Start the streaming server - a shell window will appear.
Sstart winamp, and bring up it's preferences and
find the Plugins->DSP/Effect options, and choose the
Nullsoft SHOUTcast Source DSP plugin
thus.
You'll then get a pop-up window with four tabs.
In the input tab, choose the correct input, click the
open mixer to get the windows volume panel up (close the
playback window), and choose the correct input, and adjust
the gain.
It's now time to turn on the audio source into your PC;
a radio or tape player is ideal.
If everything is working, the Input Levels should have a
working bar graph (blue vertical bars which rise in rhythm
with the music, as shown in the image), indicating that
there's audio being
received. If not, check the settings in the volume
control panel; also use the windows sound recorder tool
to test recording and play back to verify everything is
connected. Make sure the blue bars just briefly touch the
top, otherwise reduce the gain/volume or you'll get
distortion.
Select the encoder tab, choose "MP3 Encoder" for
Encoder Type, and set Encoder Settings to
"96kbps,44.100kHz Stereo". You can try different
settings later according to the computer power of
your PC - you'll need at least a 500MHz P3 to do
real-time encoding of mp3's and perform the streaming
functions.
Select the output tab.
If you're going to be running the streaming server
all the time, check the "Connect at Startup" box.
You shouldn't need to touch any of these settings
unless you changed the configuration for the
streaming server.
Click the yellow pages button; make sure the
"Make this server public (Recommended)"
is NOT checked - unless you really want the world trying
to connect to the streaming server!
You can set the URL, Genre, AIM, ICQ, IRC and
Track Title/URL fields according to taste.
You can now click the Connect button.
If everything is set up correctly, the status box will
now show numbers counting upwards.
You've now got a working streaming
server. If it doesn't connect, please go through
the above steps and check all the settings.
You should be able to use the winamp player to play it's own
stream: from the menu, select "Play URL", and enter
"http://192.168.100.1:8000" (substituting your own IP address).
Configure bluetooth and network on the Palm
You can skip this stage if you've already gotten your
Palm talking to the PC and are sure it works. It still
might be worth your while to quickly scan this section
to avoid problems! For example, users with Palm
keyboards might need to turn off the keyboard in the
preferences to use Bluetooth!
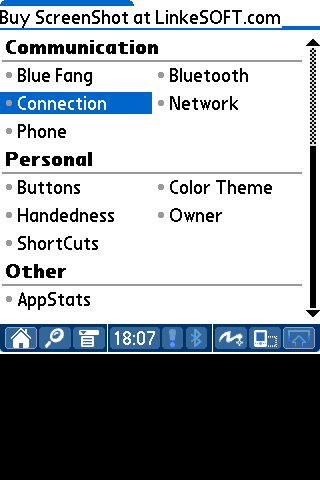
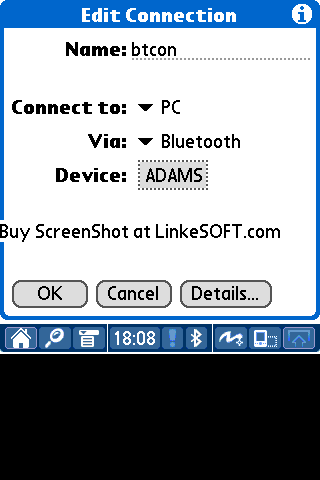
Creating a connection
In the Palm prefs, in the Communication section
(e.g.), select
Connections. Press the New button, and enter the following
details (you enter items in italics):
- Name: btcon
- Connect to: PC
- Via: bluetooth
For the Device, tap on the space for the name, and
you'll get a list of other bluetooth hosts found by the palm.
Tap "Find More" if it's not listing your PC. Select your
PC's name and tap "OK". It will then
ask you to enter a PIN
code; use a simple number sequence, don't take too long!
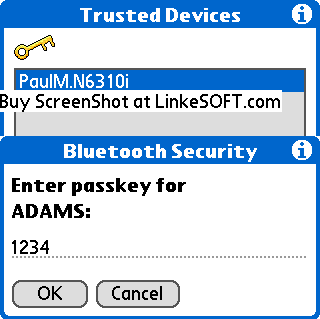
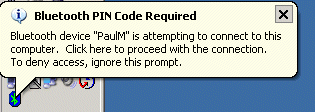
Meanwhile, on the PC, the bluetooth icon will turn turqoise on blue,
and when you've entered the PIN on the palm and hit OK,
a bubble will appear
telling you a pairing request is taking
place. Click in the bubble, and a
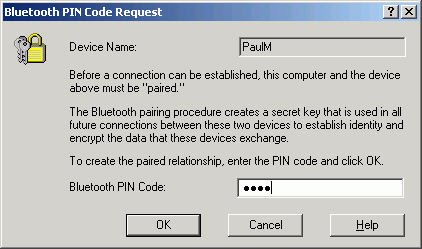
window will popup,
and enter the same PIN number.
Your Palm should now be showing this.
Great, we've just paired the Palm with the PC.
Tap "Done" to exit back to the prefs.
Sometimes, you can get an authentication failure, this is
a particular problem if you move your bluetooth adaptor from one
computer to another. The answer is to delete the pairing on the
Palm, which is done by going to the Palm "prefs" screen,
selecting "trusted devices", then tapping "details", and there
you'll have the option for "Delete Device". You can then
add the device as above, repeat the PIN entering phase, and
all should be OK.
Creating a Network
In the Palm prefs, in the Communication section, select Network.
Tap the "New" button, and set the following:
- Service: btnet
- Connection: btcon
You can leave the username and password blank.
Tap the "Details" button. Set the following:
- Connection type: PPP
- Idle timeout: 2 Minutes
- Query DNS: unchecked
- Primary DNS: blank or as per your PC's DNS
- Secondary DNS: blank or as per your PC's DNS
The IP Address is not set to automatic. Take the address you set
the PC's bluetooth adaptor to and add 1, i.e. if your PC was
192.168.100.1, make the Palm 192.168.100.2.
The end result should look this this.
You can now test the connection by pressing the "Connect" button.
Make sure you can see the bluetooth icon in the system tray at the
time, as a bubble will appear asking whether you want to let your
Palm access the network - naturally say yes, and also consider
checking the box so that you aren't asked again!
The Palm's Connect button has now changed to a Disconnect button,
and on the PC the system tray bluetooth icon is now turquoise on blue.
At this stage, for diagnostics, there's less well known feature.
Tap the Palm's menu button, and find the Options menu, where there's
a log option. You can see the handshake that occurred during this
activity and the configuration which resulted.
It's a bigger secret that you can enter commands here, such as
"ping 192.168.100.1" followed by newline; you'll see the Palm
send a "ping" to the PC, and the PC should echo back!
Great, we've got Palm networking up and running! Time for another
coffee?!
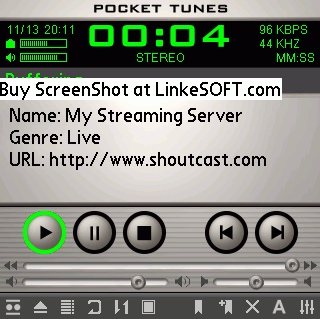
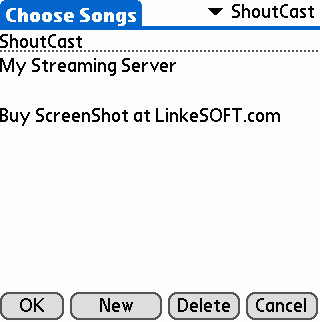
Configure Pocket Tunes on the Palm
This is, perhaps the easiest bit of all -
Pocket Tunes make this very easy for you!
When the Palm is connected to the PC's network, tap
the  menu button, and in the
upper right, select ShoutCast. Tap the "New" button, and
enter the URL as shown, i.e. append 192.168.100.1:8000.
Check the "Connect to get station name" box.
Tap "OK". You'll now see the details you put into
the Winamp plugin preferences.
The result looks like this
menu button, and in the
upper right, select ShoutCast. Tap the "New" button, and
enter the URL as shown, i.e. append 192.168.100.1:8000.
Check the "Connect to get station name" box.
Tap "OK". You'll now see the details you put into
the Winamp plugin preferences.
The result looks like this
Select the line with the shoutcast server on it, and click
OK, this will then cause pTunes to play the stream after it
has buffered enough sound.
Congratulations!. You
can now listen to the live audio stream from anywhere you're
in Bluetooth range.
More demanding challenges!
Not content with live streaming from your own PC? Well,
you can enter in the addresses of radio stations you can
see on the ShoutCast
website.
This does need the Palm's networking to have a DNS setting
in it, and is only really achievable if you have at least
a dual-ISDN (128kbps) or faster broadband link to the
Internet.
You will need to set up internet connection
sharing on the PC, this is because the network addresses
currently used between PC and Palm are special ones, unrouted on
the internet, so your Palm cannot connect to the outside
world. If you try a web-browser on your Palm, it too could
only see a webserver on your PC. You could use a web proxy,
for example, AnalogX do
a nice simple one, but this won't help Pocket Tunes.
Instead, the best method is to make the PC share the internet
connection. If you're already using your PC as a gateway for
other computers (e.g. if this PC happens to be connected to
your modem or broadband router with a separate ethernet to
other PCs), you can't make it also share the internet
connection on behalf of the bluetooth network.
To turn on ICS, open the network control panel,
select the device which provides the internet connection,
open it's properties, select Advanced, and check the
"Allow other network users to connect through this
computer's internet connection" whilst the Home networking
connection selection box is showing "bluetooth".
More information is available
here.
Using VNC to control your PC from the Palm
Once you've set this up, it's a nuisance to have to keep going
back to your PC to make changes; but using some other technology
called Virtual Network Computing, you can allow your Palm to control
your Windows desktop. Download
and install the PalmVNC client on your Palm.
Download and install
the VNC server on your PC, telling it to start the VNC service on
the PC; you'll be entering a password which needs to be secure,
otherwise anyone on the internet could gain access to your computer!
Run the PalmVNC client, connect to the PC (enter its IP address),
enter the password and now you can control your windows desktop!
Note that this will "eat" up most of the bandwidth of the bluetooth
connection so don't expect to be able to stream audio smoothly at the
same time!
Note 1. Audiograbber
is a superb freeware software package for ripping CDs and turning
them into mp3s on your PC.
Note 2. Although there aren't actually many different
manufacturers of the chips inside these units, many give them different
names and this means that windows needs the drivers specifically built for
the device you have; this is a real pain, but an unfortunate reality.
Not only that, some device makers don't make their drivers downloadable
on their websites; however, you should be able to get onto their customer
support on their website and get sent a link to allow downloading.
You can also find some downloads
here.
Note 3. I have a digital satellite receiver feeding via
optical-in to my Creative Labs' soundblaster live/value card.
I have a "s/pdif" input in my windows volume control panel
thus.
©2004 - Paul Mansfield, all rights reserved, this document may
only be {circulated, shared, printed, propagated, published on paper or
the internet} with specific permission of the author.
Version: 20041120 - Paul Mansfield - complete
W3C Valid HTML